Showing posts with label black. Show all posts

February 28, 2012

OPI's Pink Friday, Metallic 4 Life, and Fly

So, when I first heard that OPI and Nicki Minaj were pairing up for a set of nail polishes, I thought it was a match made in heaven. With Nicki's personas and brightly colored wardrobe, I knew this would be a set to watch out for. I was unfortunately only able to get 3 out of the 6 colors in the set but I am okay with that for now and I will explain in a moment. The colors I got were Pink Friday, Metallic 4 Life, and Fly.

First up we have Pink Friday which is probably my favorite out of the set. I got this because the pale bubblegum pink is a subtle color for everyday. In some lights in my house, it even blends in with my skintone when the pink isn't as apparent. However, with this being a pale color, it is extremely hard to get smooth even after 3 coats or more. In the picture above, you can see Pink Friday used as a part of a leopard print manicure for Valentine's Day as the center of the spots. The base color is Wocka Wocka from The Muppets collection.


Fly is a creme teal color that I originally was going to skip over but I thought of some interesting nail art to do with it. The basic color is similar to Who Let the Dorks Out from Sephora by OPI's Glee inspired line and it is indeed a pretty close match. The main difference being the creme finish of Fly as opposed to the glittery peacock finish of Who Let the Dorks Out. This polish was a simple 1-2 coats and it turned out incredibly smooth. Be on the lookout for a manicure inspired by Perry the Platypus from Phineas and Ferb in the future thanks to this color. ;)


Now we have Metallic 4 Life, a silver glitter polish set in a semi-transparent black gel. This gives it a distinct gunmetal look and this might rival the upcoming Set in Stone from China Glaze's Hunger Games inspired polishes. I like the medium glitter and it is a very basic glitter polish. A little too much for everyday but I can see this working for dressy occasions. The polish applies well and above you can see what it looks like with two coats on a press on nail.

Overall, I was pleased with the colors I got. Pink Friday takes some practice to apply smoothly but works well for nail art where you're only adding a little bit here and there. Metallic 4 Life and Fly are better for special occasions or if it fits a costume or outfit you are wearing. They are 1-2 coat polishes though. I will be trying Metallic 4 Life over 2 coats of the creme Black Magic by Fantasy Makers to see what that looks like as one coat would probably look amazing.

Would I Buy Again? Probably... While not perfect, I can see myself using these polishes when I travel.

September 20, 2011

A Positive Note: Wet n' Wild

I wanted to take a moment a blog about a positive experience in the cosmetics world. I purchased the nail polishes from the Fantasy Makers line at Ulta recently in preparation for a month full of Halloween reviews that I wanted to do next month. Now, this one didn't go off without a hitch but I wanted to take a moment to highlight the fact that a larger company that has promptly replied to my concern.

The Black Magic nail polish that I had purchased from Ulta was described on the display as a "black sparkle" polish. Unfortunately, the specific version at Ulta is a solid black polish. I decided to go ahead and e-mail the company because even if I didn't get a reply, I hoped that my feedback would be taken into account in the future and even if they can't do different displays for different stores, to find a way to spread the word about multiple versions of the same color that are out an about, especially since the two different colors were released intentionally.

I was very pleasantly surprised to find a response in my inbox within about an hour to an hour and a half. I had sent the e-mail in the afternoon and kept it polite as it was just something I was concerned about for others who may be looking for something a little different in a black sparkle polish.

They offered to send me a bottle of the sparkle version and all I needed to do was confirm my full name and shipping address. I wasn't writing to them in order to get free product and I want to make sure this is clear however their prompt reply and courteous customer service is something that I didn't feel should go unnoticed so I wanted to write a blog post specifically about that.

Thank you, Wet n' Wild. This is something that is refreshing in this day and age.

August 25, 2011

LotD: Bejeweled and Bedazzled

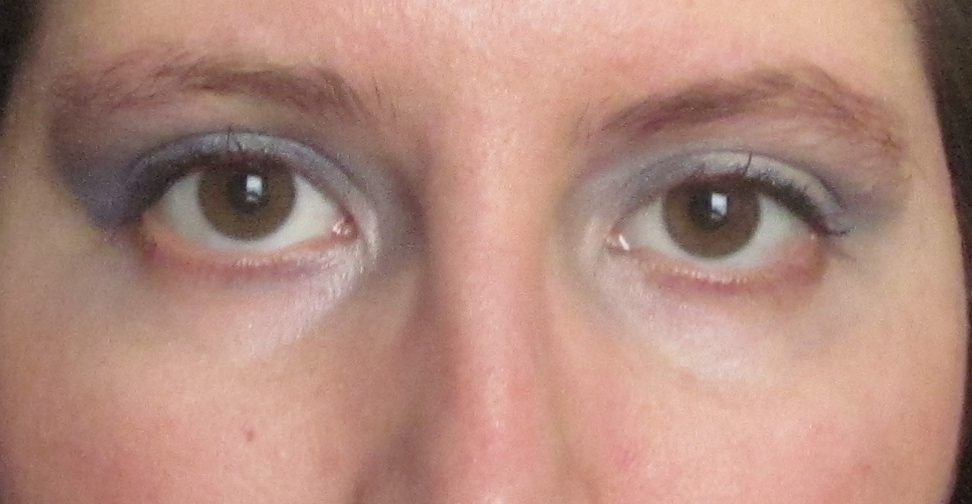
Okay, with all of the buzz lately about Win or Die from Geek Chic Cosmetics, I knew I wanted to experiment with two of the darker colors in the set. These are also the two colors that I received as full sizes from a friend of mine. Across the Narrow Sea and Born in Fire are two amazing jewel tones that go amazingly well together and with a color such as The Imp also in the same set, you really can't go wrong looking like a bejeweled beauty the next time you go out.

I didn't use The Imp in this look but it still remains one of my favorite colors.

Although the focus is on my eyes in this photo, there's a lot more to this look than just the eye color. First I used Tinted Moisturizer SPF 20 in Porcelain from Laura Mercier. It's not too heavy but gives me some of the coverage I need.


For the eyes, I used a multi-layered technique. First, I primed my eyes with Too-Faced Shadow Insurance and then I went over that with the Caviar Creme Eye Colour from Laura Mercier in Amethyst. Over the creme color, which is a warm taupe, I patted Clinique Color Surge Eye Shadow Trio in the base Lilac color over the base to wash out the color a bit. Then, I took Born in Fire from Geek Chic Cosmetics and blended it into the crease. That's the smoky purple that you see on my eyes. Then, I wet my brush and patted Across the Narrow Sea on just a little of the inner corner of my eye and blended it out.

That's it for the colors on the eye. I lined it in Wet n' Wild Mega Liner in black and just slightly winged it up at the outer edge. I tried to make sure that the wing followed my lower lash line. Then I finished with Full Blown Mascara from Laura Mercier in black and as I applied, I brushed my lashes toward the outer edge of my eye.


For my cheeks, I just barely touched my blush brush into Kingslayer from Geek Chic Cosmetics (which is also from the Win or Die set) and tapped it on each cheek and blended. I didn't want too much as that would wash me out a bit. This just added a little bit of warmth and sparkle.


For my lips, I just used a few swipes of Tokidoki Lip Balm Stain in Pink Martini. It enhances my natural lip color to look more pink and it's not as dramatic as straight up hot pink lipstick.

Product List:
For the Face:
  • Laura Mercier Tinted Moisturizer SPF 20 - Porcelain
For the Eyes:
  • Too-Faced Shadow Insurance
  • Laura Mercier Caviar Creme Eye Color - Amethyst
  • Geek Chic Cosmetics - Born in Fire
  • Geek Chic Cosmetics - Across the Narrow Sea
  • Wet n' Wild Mega Liner - Black
  • Laura Mercier Full Blown Mascara - Black
For the Cheeks:
  • Geek Chic Cosmetics - Kingslayer
For the Lips:
  • Tokidoki Lip Balm Stain - Pink Martini

August 16, 2011

LotD: Crime Scene: Do Not Cross

As you can see, I have the most awesome Crime Scene tape hair clips that were made for me in an NCIS themed craft swap. Well, now that my hair is long enough to use them I thought I would do an entire Face of the Day.

For the Face:
  • Laura Mercier Tinted Moisturizer SPF 20 - Porcelain

For the Eyes:
  • Geek Chic Cosmetics - Continuum
  • Geek Chic Cosmetics - Sleeping Bucket
  • Wet n' Wild Eyeliner - Black
  • Maybelline The Falsies Flared Mascara - Blackest Black


Eesh... I need to work on my lining skills. >.>

For the Cheeks:
  • Geek Chic Cosmetics - Eyes of the Werewolf


For the Lips:
  • Bath and Body Works Liplicious Gloss - If the Tiara Fits (Any clear sparkly gloss will do)


Overall a fun look to do and while I did use yellow and orange, it wsan't too over the top for me. Other than the fact I need to practice lining I think I'm good to go!

June 30, 2011

Swatches: Wet n' Wild Color Icon Eyeshadow Trios

So this is to supplement my previous review. Just thought I would post photos of some swatches in natural light.
L to R in natural light: I Dream of Greenie  the Eyelid, Crease, and Browbone colors.

L to R in natural light: Spoiled Brat Browbone, Crease, and Eyelid colors.

Spoiled Brat's colors made me instantly think of Codex from The Guild as her costume colors are predominantly a deep pink, white, and gold so I would subtitute the silver in for the white and probably use the black as a liner. This is probably going to be my next Eye of the Day as well. 

Also Note: These photos are swatches without primer. When I do my eyes, I always use a primer and my primer of choice at the moment is Too Faced Shadow Insurance. It increases the vibrance of the color and also increases wear time.

June 29, 2011

EOTD: Patty O'Green

I love this look so far. It's a daring day look using Wet n' Wild Color Icon Eyeshadow Trio in I Dream of Greenie. I decided to do what I've learned as a smoky eye. However I knew going in that it's wouldn't be that smoky. I'm really pleased with the results and the more I looked at it, the more I thought of Patty O'Green from Rainbow Brite.
As always, I primed my lids with Too Faced Shadow Insurance and the mascara was MAC False Lashes but otherwise all of the shadows are from the same Wet n' Wild palette. Even my eyeliner was the same brand.

After I primed my lids, I took the medium color and patted it all over the main part of the lid. I made sure to go all the way down the lash line but I was very careful not to blend it too much into the corners or the crease.

After this, I took what was supposed to be the crease color and blended it along the upper lash line. Then, took the browbone color and blended it into the crease. You can take this up to the browbone if you wish, but I wanted to keep this at least a little subdued (HA!) for daytime.

After the colors are blended together, I took a black eyeliner pencil also from Wet n' Wild and lined my upper lash line.

Then, I applied two coats of black MAC False Lashes mascara.

Pretty simple to do and a stunning look IMO.


June 21, 2011

EOTD: Rippin' Str8 to Your Heart


This eye of the day was inspired by the members of Str8 Rippin'. Another pro team in the MLG, these guys took 2nd place at MLG Columbus. 

This is their logo which inspired the look through their team colors. All of the eye colors came from the Sephora Color Play 5-in-1 Palette. First though, I made sure my eyelids were properly primed with Too Faced Shadow Insurance. Then I patted on a shimmery bright blue. I took a flat, stiff brush and used a dark navy blue from the palette to line my lash line. At the outer corners, I used a shimmery black and patted it on to build up some color but kept it to a very small area. Then, I put Pro Longwear Mascara from MAC in Burnt Umber on my upper lashes only.

I think this look is a great casual eye that still has some pop to it. You can wear it with jeans or with something a little bit dressier.

On the Face:

  • Laura Mercier Tinted Moisturizer in Nude
On the Eyes:

  • Sephora Color Play 5-in-1 Palette:
    • Bright Shimmery Blue - all over
    • Shimmery Black - outer corner
    • Deep Navy Blue - liner
  • MAC Pro Longwear Mascara - Burnt Umber

June 20, 2011

EOTD: The Godsquad

So I've been wanting to do eye makeup based on some of the top Halo teams but I didn't have the makeup palette or the selection of colors to really do what I wanted with my makeup. Well, today that's changed. With my new Sephora 5-in-1 palette in hand, I set off to make a look based on the current Godsquad of Halo, Roy, Lunchbox, Ogre2, and IGotUrPistola, the current line up of Instinct.

For those of you who may not be familiar with Major League Gaming, let me give you an idea. Major League Gaming, or the MLG, is a videogaming league. Their main attraction is usually Halo (right now, Halo: Reach) but they have other games spotlighted as well. This year, they also have Call of Duty: Black Ops and Starcraft II. I started attending events in 2009 with MLG Columbus as Press and since then I have gotten to hang out and interview some of the top pros. Now, I go to support them and they are nothing short of awesome.

In celebration of Instinct's 1st place win at Columbus, I thought I would start with them and go from there.

This is their logo which is where I got most of my color inspration. The main difference is that I decided to use white as the dominant accent color and black as the secondary as I think it looks better on my eye.

Now onto the colors used.

On the Eyes:
  • Too Faced Shadow Insurance
  • Sephora 5-in-1 palette - Shimmery Grass Green Color and Shimmery White
  • Make Up For Ever Aqua Eyes - Jet Black
  • MAC Pro Longwear Mascara - Jet Black
So not much is really needed to achieve this look but with the bright green, I think it adds a bit of a pop to the look. Now for the photos!


June 15, 2011

EOTD: Sapphire Stardust

A very simple eye that can be layered to become more daring. Silver fades to a deep blue and eyes lined with a bright blue liner.

Items Needed:

  • TooFaced Shadow Insurance
  • Jane Zingers in Hi-Ho Silver
  • L'Oreal Palette in Sapphire Sea
  • Isadora Eyeliner in Blue
  • MAC Pro Longwear Mascara in Jet Black
I started off with Too Faced Shadow Insurance. Now that I have it, I swear by it. And it really did help in the application of my eyeshadow.

Next, I patted on Jane Zinger in Hi-Ho Silver. I also dabbed some on the inside corner to add some sparkle there.

Now, I took the dark blue color from my Sapphire Sea duo by L'Oreal and put the blue on my outer corner and in my crease. Then, I lined my lashline with my Isadora blue eyeliner and flared it up at the corner.

Then, I applied 2 layers of MAC Pro Longwear Mascara in Jet Black to get a full lash look.